


Crew Cloning Pod
- Regular Price
- $4.00
- Sale Price
- $4.00
- Regular Price
- Unit Price
- Translation missing: en.general.accessibility.unit_price_separator
Say hello to your new propagation best buddy! One of the fastest propagation methods with a much higher success rate vs other methods. This technique is called air layering. You might also see cloning pods called a cloning ball, propagation ball, grafting ball or rooting ball.
Crew Cloning Pods measure 8cms wide and 10cms tall. The stem openings fit stems measuring up 3 to 5mm thick or you can snip off the removable tabs to fit wider stems up to 9mm thick.
The Crew Cloning Pod is super simple, reusable propagation tool that clones your favourite indoor plants without having to cut them off the mother plant first. It's a much faster and more successful propagation method compared to cutting first then propagating in water or soil (and crossing your fingers!).
Benefits of a cloning pod
- Clone your favourite plants without cutting first.
- Roots faster than water or soil propagation requiring cutting.
- Clones while attached to the mother plant = a higher success rate vs methods requiring cutting before propagation.
-
See-through plastic pod makes monitoring root growth & substrate moisture easy.
- Creates a new plant ready to pot up within 2 - 4 weeks on most indoor plants (allow 6 - 8 weeks for slow-growers, or when used in cooler temps or lower light).
- Popular, proven propagation technique for Monstera, Philodendron, Pothos, Epipremnum, Fiddle Leaf Fig, Ficus Elastica & many more indoor plants + outdoors for roses, fruit trees, Magnolia and Camellia.
-
Easier to use + less mess compared to air layering with plastic wrap.
- Reusable for a more eco-friendly alternative to throw-away plastic cups or plastic wrap.
- Better propagation method during autumn and winter when conditions aren't ideal for propagation from cuttings.
- Pods grow soil roots. No risk of water roots not adjusting to the shift to substrate when potting up.
How to use a cloning pod
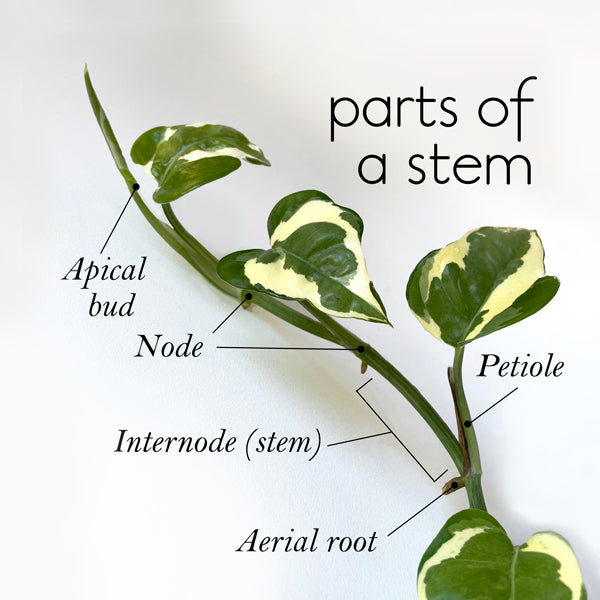
Before you start, locate a node. Ideally one with aerial roots. Apply a dab of rooting hormone for best results.
STEP 1. Prep your substrate. Choose your substrate. Wet with water or rooting solution.
STEP 2. Fill your pod. Position your pod with the wider opening at the top for easy watering. Fill both halves of the pod with your substrate of choice.
STEP 3. Close your pod. Secure around the node using the snap-lock or bands (provided).
Wait and water. Wait a few weeks for roots to be visible. Keep substrate moist. If extra moisture is needed, simply water through the funnel at the top without disturbing roots.
STEP 4. When ready, remove and pot up. Once roots have developed, open the pod. Gently remove substrate from around the roots. Cut the stem right below the new root ball, and pot up directly into the substrate of your choice. Done!
The images below show nodes and aerial roots. You can use any node, but one with aerial roots will root faster...

*Please note if buying as a gift, that this product does not come with retail packaging (no printed box or anything fancy)*