There's something a bit special about Ficus. Like having a tree indoors. Whether it's a Fiddle Leaf Fig (Ficus lyrata), or one of the many Ficus elastica like a Ruby or the Tineke in the photo below; those huge, glossy leaves are just gorgeous (although I don't love the dusting, but wow they look amazing after a little natural leaf shine).
The problem is Ficus lyrata and elastica have a habit of going up, up, up, until you end up with one looong single stem. Or they shoot up but dropped a lot of leaves further down along the way, so now you have a tall stick! Then what?

Amazon links in this post may be affiliate links which means I may receive a commission for purchases made through links (but doesn't change the price you pay). Learn more
Which method's right for your Ficus?
You've probably heard of the first of these 4 methods below. It's the one everyone tells you to do in plant groups when you ask how to make your Ficus branch out. Except that method won't help if your Ficus is one long stem already, as all it does it make it branch out waaay at the top. It's method 3 you want instead.
IF YOU HAVE A BALD FICUS...
If you've ever had the misfortune of owning a stressed Ficus, you've probably experienced their habit of dropping leaves. Ficus can be notorious leaf droppers, even if you just move them from their favourite spot (how dare you?!).
When you first bring a Fiddle Leaf Fig or Ficus elastica home is normally the riskiest time, especially the Tineke with their high variegation, making them weaker and more prone to browning and leaf drop. Like a plant tantrum!
Except unlike the Ficus Benjamina, who tend to grow their leaves back relatively fast once happy again (my Benjamina Weeping Starlight threw a huge fit when we moved house but is recovering nicely now); Ficus lyrata and elastica often embrace their new found baldness, and you end up with permanent bare patches down the stem. For them you want method 4.
IF YOU HAVE A SMALL FICUS...
But what about the babies? If you're clever and planning ahead, then yes, method 1 is for you. That way you can grow a full, bushy Ficus from the start (it's worth repeating this method often by the way, I do it once every growth season).
IF YOU WANT TO CLONE YOUR FICUS...
And if you fancy your chances of cloning yourself a whole new Ficus, method 2 is the combo deal for you, where you can both propagate and create a bushier plant at the same time. Win win.
None of these methods are quite the same as pruning. Pruning normally involves cutting back a plant to make it smaller, cut off old growth or to tidy and even up the appearance of a plant, rather than these methods which are designed to trigger new growth soon after. Pruning Ficus is often best done in winter whereas these methods are best done in spring and summer during the growing season (and in case you are a fellow grammar-geek like me, yes, it's correct not to capitilise the seasons).
Be warned
Before we jump in to all 4 methods, 2 quick words of warning...
Be patient
Ficus won't be rushed. It's rare for them to do anything quickly no matter which method you choose, and none of these methods come with a guarantee of success. However all have worked for me (with a little patience).
In the right conditions you can expect multiple nodes to activate and produce new growth. In less than ideal conditions, the success rate drops and none or maybe just one node will come to life. In general, if it's warm and bright, these methods work a treat, showing results as soon as 4 weeks but more likely in 6 to 8 weeks.
Watch out for the sap
Last warning before we jump in, is to watch out for the sap that Ficus produce. Be prepared. When you damage the stem (required for all 4 methods), your Ficus will produce a milky latex sap (which is how they got their common name of Rubber Plant). It will well up and drip or run down the stem for a short time afterwards. Get paper towels or similar ready in advance to keep on hand to dab up the sap once it's stopped flowing.
The sap is sticky and can stain, so it's best to pop a paper towel or similar under your plant as you don't want it on the floor (or your clothing). The sap can also irritate your skin, so avoid getting it on your hands, wash your hands as soon as possible if it does get on your skin, or wear gloves. Keep the plant away from kids and pets until the sap has stopped weeping out as it can be toxic.
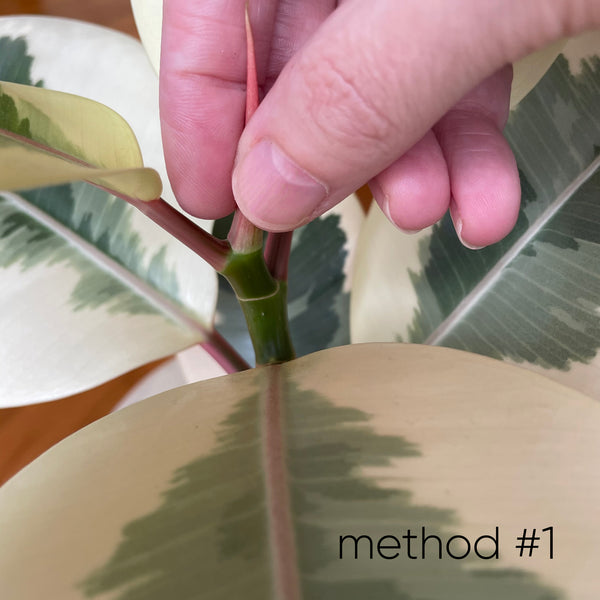
Method #1: Remove the growth tip
This is the most well-known way to get a Ficus to branch. Pinch off the growth tip! The growth tip is where auxins are most concentrated. Auxins are growth hormones that tell the plant to grow there, and not to grow further down. With the growth tip removed, the change in auxins is what triggers new growth, further down the stem. One or sometimes multiple nodes below will activate and branch or put out new leaves.
Method 1 is best for shorter / younger Ficus. I also find this method usually works best to trigger the most growth, because you're right at the tip of the plant where the growth hormones are concentrated. But because you’re not taking a node cutting, you won’t be able to propagate the growth tip. And if you have a Ficus that is already one tall long stem, this method only activates new growth right at the top.

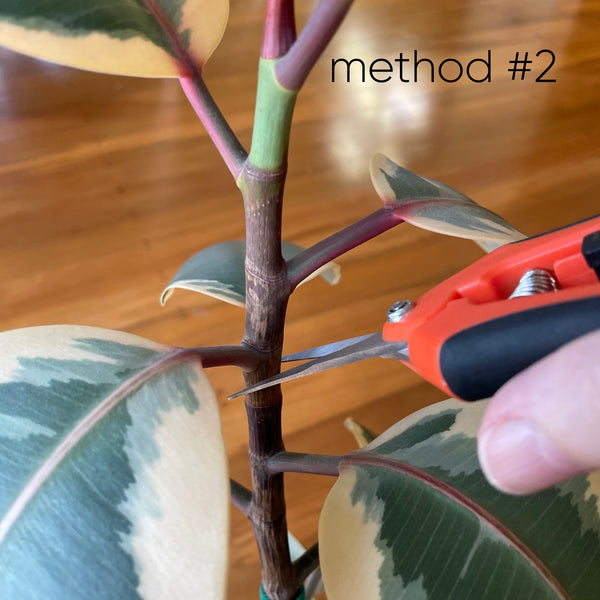
Method #2: Take a node cutting
This method is a 'two-for-one' deal. You not only trigger new growth, but also get the bonus of using the cutting to grow an entire new plant. This method works well for a Ficus that has a bit of height already, as you're about chop a good 15cms or so off the top.
Normally for smaller Ficus I use method 1 and for taller Ficus I use method 3. If you're wanting to propagate anyway, go for method 2 no matter what the size of your plant, but I would only remove 1/4 of the plant in total at one time, maybe 1/3rd if your plant's really healthy and actively growing anyway.
Like the other methods, this is best done during the growing season (spring and summer unless you're blessed with tropical conditions all year round where you are), but because this method also includes propagation, warmth and humidity are extra important. If you're doing this in cooler or lower-light conditions, grab a heat mat and grow light.
Where to take a Ficus or Fiddle Leaf Fig cutting
Locate the nodes (see the photo below). They are super easy to find on most Ficus as they appear as rings around the stem. You want to find a good spot to cut, between two nodes, that will leave you with a section of stem that has at least 3 to 4 leaves, and is at least 15cms long for the best chances of successfully propagating a new plant from the cutting.
And yes, a longer cutting like this is more important for harder-to-root cuttings like Ficus, than for your easy guys like Pothos and Philodendron.

You'll be making your cut on about a 45 degree angle, about 2cms above the node or leaf below where you're going to cut. Some Ficus have tough, woody stems so you want to use nice sharp, sturdy shears or snips. Make sure they are clean before you start (I wipe mine with hydrogen peroxide).
A less mature Ficus, or one grown in brighter light, may only have short internodal space (like the name suggests, the internode is the stem in the space in between nodes), so for those just aim for the middle of the internode about half-way between nodes, like my Ruby Ficus below.
Be prepared. Keep those paper towels on hand as this method produces a lot of that milky, sticky latex sap. Wash it off your hands as soon as possible or wear gloves. Also take a break to wash it off your shears or snips asap too, before it dries, rather than waiting until you've sorted out your cutting. Hot soapy water works well.
How to propagate a Ficus cutting in water
In ideal conditions, the mother plant will activate multiple nodes below the cut. As for your cutting, I normally remove the bottom 1 to 2 leaves, so I'm left with 2 leaves and the growth tip. You can propagate in most mediums. I prefer water so I can keep an eye on when root growth starts so I know when to start feeding.
A Ficus cutting with too many leaves is more likely to fail as the small amount of nutrients the cutting has stored in it, get used up faster before roots can take over providing them. You'll also have the best chance of success if the mother plant was healthy and growing. Cuttings from a plant that isn't in peak health are more likely to fail.
Once the sap has stopped weeping out from the stem and lower leaves you removed, dab the sap off, and dip the stem in rooting hormone. I prefer Clonex, a rooting hormone in gel form that helps root growth start sooner, as well as sealing the cut and helps prevent it from rotting. I don't use Clonex for my easier-to-propagate houseplants but find it makes all the difference with the harder guys like Ficus. You can get Clonex in New Zealand here or from Amazon here.
At first you'll normally see little white fuzzy calluses appear on the stems. Those are bunches of cells which should turn into roots. When roots appear, start feeding. Either use a root fertiliser (which you use by itself), or root booster (that you add to your fertiliser), or just using your normal fertiliser is better than nothing, although I'd go for one lower in nitrogen to keep the focus on growing roots rather than foliage.
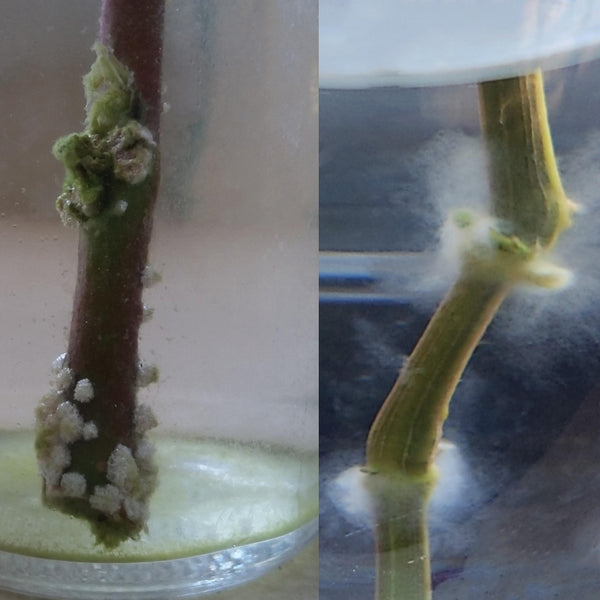
Above: Don't confuse the white bunches of cells (left) for slime mould (right)
A lot of people skip adding fertiliser at all when rooting in water. I find you're more likely to lose a leaf or two (they'll often turn yellow, then brown and die), on your cuttings if you don't feed those new roots. I might not always use Clonex when I propagate but I always feed once roots appear.
My go-to root fertiliser is GT CCS 9that link is for those in New Zealand), which is a complete and balanced rooting fertiliser for use when growing in water and works even better if used with Clonex. PS: You can get GT CCS root fertiliser here from Amazon also if you're not in New Zealand.
Method #3: Notch the stem
The notching method is my go-to for taller Ficus. This can also work a treat for your baldies who are leafy up top but have bare stems below. Put down those snips! There's no need to remove the growth tip or even chop the stem. If all goes to plan, you can activate growth a lot further down the stem compared to the previous 2 methods also.
Get some clean, very sharp shears, snips or even a knife. Pick a spot about half way between 2 nodes, and choose the side you want it to be bushier on. You want to cut the stem downwards, on about a 45 degree angle, and go in about 1/4 of the way through the stem only. Thicker, older, woodier stems you can go as far as 1/3rd through.
Now make a second cut but this time you want to cut so you end up removing a triangle shaped wedge or notch out of the stem. It's hard to describe so this photo below should be more helpful (this is after the sap has stopped flowing, has been dabbed off and it's started to callous, it will be a mess at first!).
Don't be scared! If you cut too shallow you'll only cause a scar, which will heal without triggering growth. You'll likely need to apply a bit of pressure or even 'saw' with a knife to get through as older Ficus and older growth will have tougher, woodier stems. Don't go full pressure immediately though, as you want to control how deep you cut, and not accidentally chop right through!

Again, watch for the sap. This method will get sticky sap on your knife / shears / snips, so as soon as you're done, wash your tools with hot water and soap to remove the sap. It's much easier to remove if washed off before it dries. Once it's calloused, although this is optional, I always add a dab of cloning paste over the wound. More about that below...
Method #4: Cloning paste
Similar to the notching method above, but adding this step can not only increase your success rate but also has a better chance of activating multiple older nodes where you have a bare patch of stem.
This is my preferred method for a Ficus that's dropped a few leaves and left behind a bare patch further down the stem. I find this method a bit hit or miss on woodier, older growth, which can be harder to activate, so the sooner you give a bare patch of stem some attention the better.
Create a notch first following the steps in method 3 above. If you have a long area of bare stem, I notch near the top of the bare patch. Now locate a leafless node. You can pick more than one node, but I'd only apply cloning paste to two or three nodes maximum, and on every second to third node along the bare patch of stem, not every single node. Cloning paste is strong stuff and will normally cause the node it's applied to, as well as other nearby nodes above and below, to all activate.
Apply a pea-sized amount of cloning paste over the notch, and on one or two nodes further down also. I've had the best results using the brand Crazy Keiki cloning paste but don't go crazy with the Crazy Keiki! It takes a LOT of energy for a plant to activate new growth, and plants normally grow one leaf at a time, so it's best to only apply cloning paste to 2 to 3 nodes maximum at one time, otherwise you stretch the plant's resources too thinly and you may not get growth, or may only grow small leaves. You can get Crazy Keiki here in New Zealand or it's available here on Amazon.
With all methods, but especially this one, remember to keep feeding! New growth, especially from multiple nodes at once, needs more fuel. Fertiliser fills your plant's reserves, ready to fuel that accelerated growth. Ideally you want a nitrogen-rich fertiliser that focuses your plant's efforts into foliage. My favourites for foliage growth in Ficus are Plant Runner, GT Foliage Focus or Dyna-Gro Foliage Pro.
What next?
Now just keep feeding every time you water (the weekly weakly method is great for Ficus), and wait! Warmth and light both help trigger new growth also, but because Ficus don't tend to like change, I normally return them to their favourite spot to recover and get growing. If you're doing all this during growing season in ideal warm, bright conditions, watering is bang on and you're feeding, you might see results in as little as 4 weeks, but more often I find 6 to 8 weeks is more typical for Ficus, They don't do things fast (except drop leaves!).
Happy growing :)
Anna
ABOUT THE AUTHOR: Anna is the owner of plant store Love That Leaf which specialises in products for indoor plants. She is also the resident writer for NZ Gardener magazine on the topic of indoor plants. You'll see her houseplant care articles in-stores and online on Stuff, The Post, NineHoney, Express, Echo and more.
Keep learning...

This is my go-to method for feeding all my indoor plants. So much easier to keep track of and better for our plants. Here's how to use the weakly weekly method to feed your plants >

Super annoying for us, but luckily not that harmful for our plants (if you get rid of them early). Here's how to get rid of fungus gnats once and for all >