Except I wasn't entirely sure what a node was, let alone where to cut...
If your plant is a good candidate for water propagation (most of our indoor houseplants are), then this step-by-step how to guide with photos is for you. One of the most popular indoor plant families that propagate really well in water are Aroids, that's plants like your Monstera, Pothos, Philodendron, Epipremnum and Scindapsus, making them a great place to start your propagating journey. But there are lots more good candidates this method of node propagation in water works well for, including Syngonium, Hoyas, Ficus, Begonias, African Violets... the list goes on (and on).
And yes, there are lots of other ways to propagate, but water propagation is the simplest way to start if you're new to propagating plants. Propagating in water is also my go-to method to speed up the process, as cuttings root faster in water vs soil. It also helps monitor progress and know when to pot up as you can easily see what's going on.
Plus it's VERY satisfying watching those roots grow :)
PRO TIP: Water roots and soil roots are NOT different types of roots, they are an adaptation to what they're growing in, but growing roots in water normally has a higher success rate and happens faster in water vs soil.

Some links are Amazon affiliate links, which means I may receive a commission for purchases made through links but it doesn't change the price you pay. Learn more
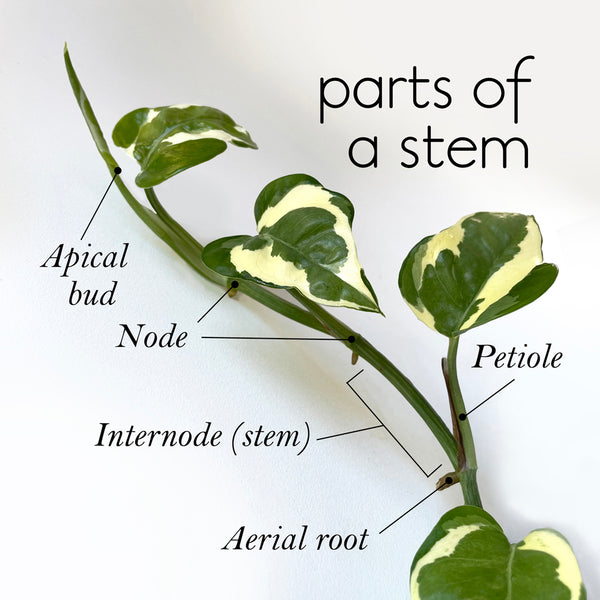
Step 1: Know your plant's bits (and find the nodes)
The main planty parts you'll be looking for are the nodes, which I've marked on my Pothos N'Joy below. You can see the nodes are located at each junction where the petiole and leaf grow out of the main stem. On a lot of plants the node is easy to identify as a raised ring around the stem.
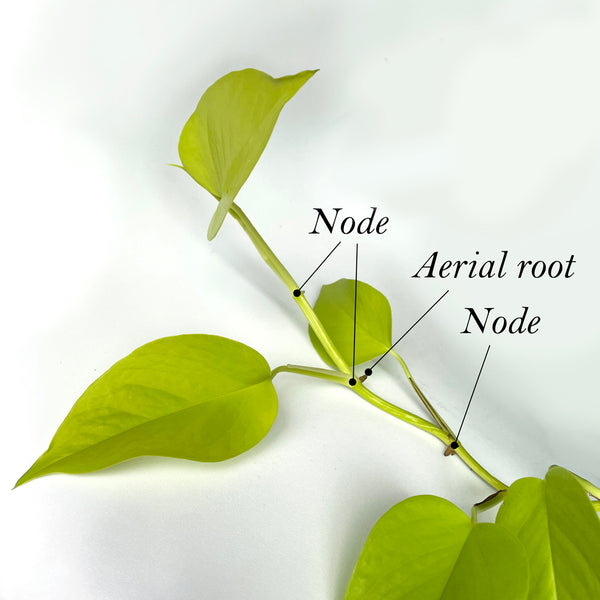
You'll sometimes see little nubby aerial roots beside the nodes also. Or in the case of some plants like Monstera, they can be monster aerial roots! Here's my Neon Pothos below with the nodes and aerial roots marked. This plant is going to be our guinea pig for today's tutorial on where to cut...
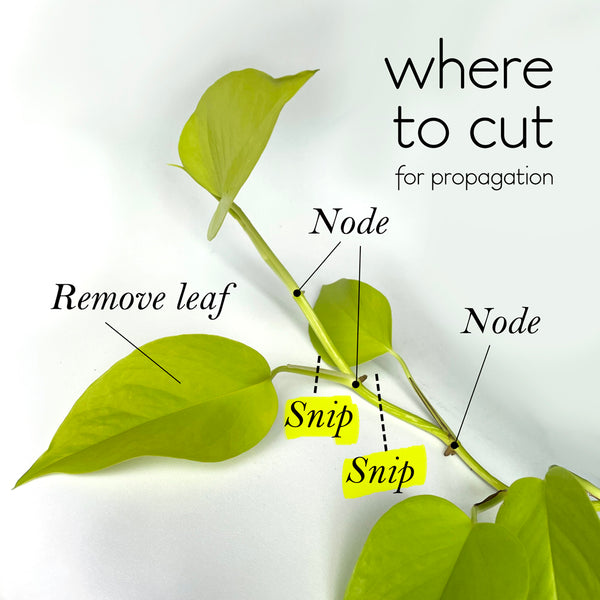
Step 2: Cut below a node
Using this method, I like to have at least two nodes and two leaves on each cutting, but you can propagate with less or more. Too many leaves on a cutting however can slow things down and reduce the chance of success. You can even propagate from a 'wet stick' (also called a 'chonk'). That's the name for a section of stem with a node but no leaves.
Once you've located a node, it's time to get the snips out. Make sure you're using sharp, clean snips so you don't pass any fungal disease, pests or other diseases between plants. Rather than risk passing any nasties between plants, I give my snips a quick spray or wipe with 3% hydrogen peroxide which kills 99% of bacteria, viruses, mould and fungi like root rot.
If you're not in New Zealand and can't get the brand of hydrogen peroxide for plants that I use (Forsana Plant Care Plus), then Essential Oxygen 3% Hydrogen Peroxide is available on Amazon plus there are lots of brands of hydrogen peroxide around, just make sure it's the right strength for plants (3%), and it's food grade.
Pro Tip: Cut stems on an angle
I cut stems on a roughly 45 degree angle, but the exact angle doesn't matter, as long as it's NOT straight. The idea behind cutting the stem on an angle vs straight is to find a balance between disease, water and roots. Straight and angled both have benefits.
Cutting straight reduces disease because the surface area is reduced, helping cuttings seal faster. Cutting on an angle is thought to help increase root development and nutrient uptake. Of course we're putting roots first, that's sort-of the point, so I always cut on an angle, but there's another easy way to protect from disease like stem rot, coming up in step 4 below.
Where to cut when propagating...
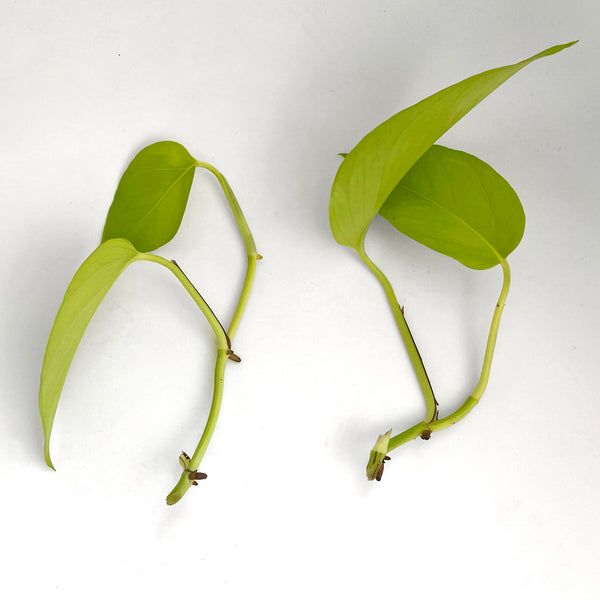
When you're ready, snip the stem on an angle a cm or so below a node, ideally below a node that includes an aerial root. You can work your way down a stem and get multiple cuttings by repeating this same step below every node, or below every second node, making sure to include leaves.
Below is where you could cut this stem, or you could shift down the stem a bit, and cut below one node further down instead to give you two nodes in the water. The key thing is to cut below a node but still keep a few leaves...
Why include an aerial root?
Aerial roots, water roots and soil roots are all roots, just with different adaptations according to what they grow in. They can all absorb water and nutrients, so including an aerial root in your cutting will help the cutting survive while those new roots grow.
Step 3: Remove extra leaves
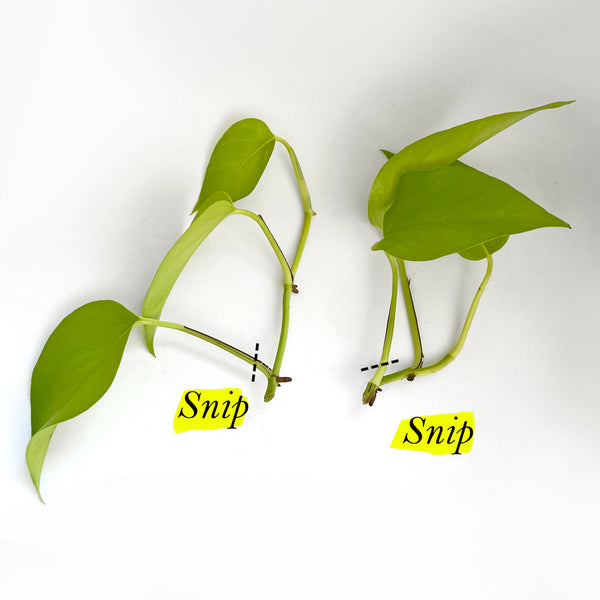
Keep the top leaves on your cutting - the roots will benefit from them later for photosynthesis to fuel that new root growth - but I always remove the bottom leaves near the node that's going in the water, so the leaves don't end up rotting in the water.
You also DON'T want too many leaves on your cutting, as without roots the plants can't support lots of leaves for long. On most indoor plants, the nodes are where the new roots are going to grow from. This should mean you end up with cuttings that look a bit like this, below (after you've trimmed off the leaves by the bottom node)...
Step 4: Dip in rooting hormone
This is a step you don't have to do, but it's one I strongly recommend. Especially if the plant is precious to you. If you're going to cut off that lovely growth tip you might as well do everything you can to make sure it actually roots not rots!
There are a few rooting hormone pastes, powders and gels on the market. My favourite hands-down is GT Clonex < that's the link to get GT Clonex in New Zealand, which is also marketed under the Yates brand here, called Yates Clonex (which GT makes for Yates). Or if you're not based in New Zealand, you can get Clonex here from Amazon.
Clonex is in a gel form. If you prefer a powdered cloning paste, an NZ option is Egmont IBAdex or on Amazon Bontone Rooting Powder uses the same source of rooting hormone, IBA.
Why I prefer Clonex is because it's not just a source of rooting hormones, but is also antifungal, so helps prevent rot while also speeding up the time until a cutting roots. Most rooting hormone products only provide IBA.
Dip the bottom 1.5cms of the stem of your fresh cutting in the power or gel. Tap off the extra before putting your cutting in water (or soil or spag moss or your substrate of choice). If I'm going into water I like to let the dipped cutting sit out for about 15 minutes first.
PRO TIP: When to let cuttings callous
You'll see the advice given for some plants to let the cutting callous first. A callous is like a temporary 'scab' that plant's form to help protect the cut stem from drying out as well as nasties getting in, helping prevent stem rot. In some plants it's the callous where the new roots will form, such as succulents and cacti, as well as woodier or thicker-stemmed plants such as Ficus.
As a general rule, thicker- or woodier-stemmed plants, and plants with fleshy stems like succulents, benefit from letting a callous form after cutting and before putting them in water. Softer, thinner-stemmed plants like Pothos and Epipremnum don't benefit from waiting for a callous to form first (it can even be detrimental).
Plants you should let callous
This isn't a complete list but a few I would recommend letting callous include succulents and cacti like Crassula, Echeveria, Sedum, Haworthia, Gasteria and Snake Plants (Sansevieria), as well as thicker-stemmed Monstera like Monstera deliciosa (but not the thinner-stemmed Monstera like most Adansonii), as well as woody-stemmed plants like Ficus, including Fiddle Leaf Fig and Ficus elastica.
Step 5: Put in water
Most small vases, cups, glasses or similar will do the job nicely for this step. You want to find a balance between a vessel that keeps leaves out so they don't end up rotting in the water, but keeps the stem submerged in water (especially keeping one or two nodes in the water).
I prefer a small to medium sized vessel for my cuttings. For me that's a size that holds about a cup of water (around 250mls or so), where the water level doesn't drop as fast due to evaporation, and roots have extra room to grow.
Whatever size your vessel, a good tip is to put them in an area you go every day, like by the kitchen sink, so you can keep an eye on that water level. Find a spot that's warm and bright. Both help those new roots grow, but warmth is more important at this stage for supporting root growth, more than light at first.
So much so, that if you're propagating in winter or in cooler temperatures, definitely get yourself a heat pad to trigger root growth. I use the these heat mats for mine. If you're not in New Zealand, you can get the same Inkbird Heat Mat here on Amazon. Avoid direct sunlight as it can burn the leaves (one reason a windowsill might not be the best idea).
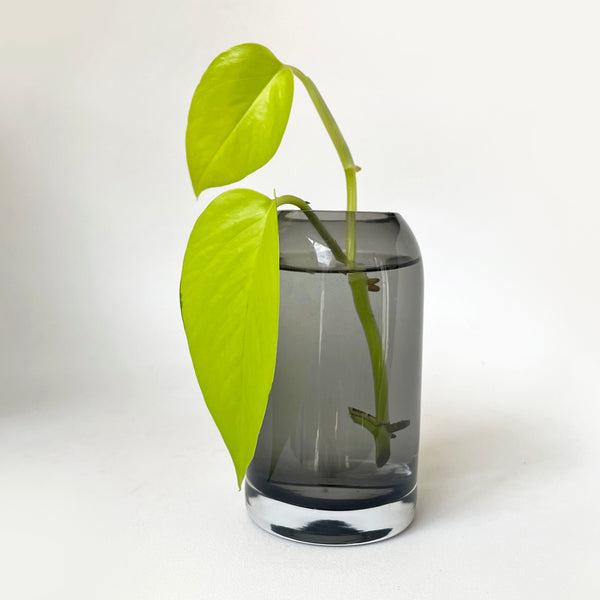
Here's one of those Neon Pothos cuttings from earlier, below. Snipped, dipped in Clonex, popped in water and ready to get those roots growing. This cutting ended up with 3 nodes and 2 leaves. You can see one node above the water, and two nodes below (I like having 2 nodes in water when I can as it increases the number of roots)...
Step 6: Fertilise!
There are 12 essential nutrients plants need that they can't get from light, air and water alone. At first, the extra boost from Clonex should be plenty, so I don't worry about feeding the plant until roots start to grow. At the first sign of even a little nub, I start providing the nutrients needed to grow more and stronger roots, faster, and get that foliage started. Start feeding as soon as you notice the first signs of roots growing.
There are lots of fertilisers suitable for water propagation. In general they will be low-nitrogen (higher-nitrogen fertilisers are focused on foliage growth, not roots). The label should also tell you if they are suitable for hydroponics (growing in water).
My favourite by far is called GT CCS, made by the same company who make Clonex. CCS stands for Clonex Clone Solution. You can get CCS from Amazon also if you're not based in New Zealand like I am.
GT CCS is a complete root fertiliser, gentle enough for cuttings and seedlings (low nitrogen and no sodium, chlorine or chlorides), and is formulated for use in water. CCS is formulated to grow roots rather than foliage. I use just 5mls per 1 litre of water so even the little 250ml bottle they make lasts me a very long time.
Step 7: Change the water
There are two main schools of thought when it comes to changing water when propagating. I do a mix of both. One is to completely change the water at least once a week. The other is to top it up with fresh water at least weekly.
When propagating on a heat mat in winter, or when the weather's warmer, I top up every day or two, then I also completely change the water about weekly (or when I remember!).
Topping up helps keep up with evaporation, but fresh water also helps replenish oxygen and nutrients for the roots. That's also the time to add root fertiliser (like GT CCS, linked above), to keep a fresh supply of essential nutrients to support faster growth of healthier, stronger roots.
And yes, roots CAN rot in water! It's a myth that roots rot in wet soil but not in water. Oxygen (or a lack of oxygen), is they key to avoiding root rot when growing in water AND in soil.
Step 8: Remove from water
Once your cutting has some nice healthy water roots underway, it's time to remove them from water, and pot them up in the substrate of your choice. I'm often guilty of leaving it too long to pot up my water propagated plants. More roots is not necessarily better once you reach a certain point.
You can stay growing in water, but if you do plan to move to soil or another substrate at some stage, then don't leave them too long in water. Left too long, those delicate water roots have a harder time transitioning to bigger, tougher soil roots, and you could lose your new plant after all your patience. Here's the difference between soil roots and water roots (and how to prevent them rotting) >
Pro tip: When to remove rooted cuttings from water
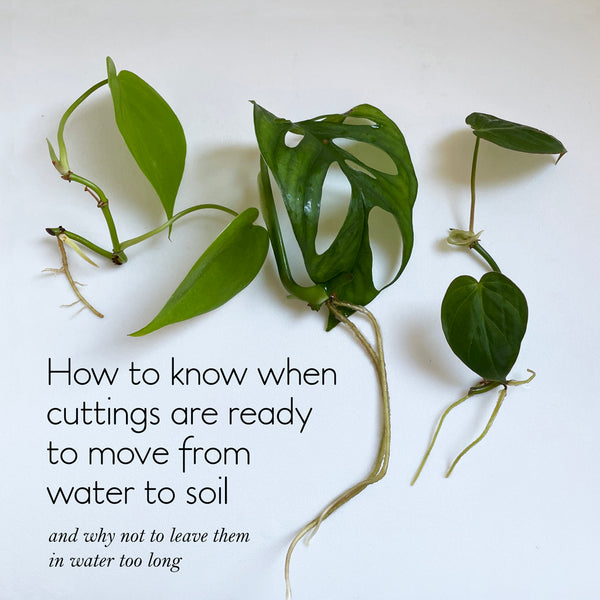
An ideal time for your cutting to graduate from water to soil or another substrate, is when the main root reaches around 3cm to 5cms long, or an even better sign, is when the main root also starts to branch and send out side roots. Some don't branch for some time, and the main root just gets longer and longer, so I use the length as my main guide for when it's ready.
Here are a few rooted cuttings below, all ready to pot up. You can see how the roots have grown from the nodes on each one. The cutting on the left (Epipremnum aureum 'Neon'), has started to branch, the roots on the middle cutting (Monstera adansonii), have been left a little longer than you'd need to, so definitely ready to pot up, and on the right (Philodendron hederaceum) you can see roots are an ideal length, and roots have grown from two nodes on that cutting. Both the cutting on the left and right are an an ideal length and stage for potting up.
How long does it take for cuttings to root in water?
A few factors come into play with how long it might take before you start to see roots. Some plants produce roots super fast, within a week or two, some take 4 to 8 weeks or longer.
Heat and light both help with warmth being a key factor (which is why propagating in winter is more difficult), and a rooting hormone like Clonex definitely speeds everything up considerably.
But until the first root appears, there's no need to fertilise. Warmth, light and a boost from rooting hormone is usually plenty and you should have roots starting in no time. Before you know it you'll be admiring your new baby plant, created by you!

PRO TIP: Add a Pothos!
If you have a Pothos in your collection, another tip shown to speed up root growth is to add a pothos cutting to the same water as the cutting you're waiting to root. Pothos release a natural rooting hormone into the water that helps trigger root growth in other cuttings sharing the same water.
You made it!
I hope you feel more confident now about giving it a go yourself, or found out a few new tips and tricks even if you've done it before. It's in my nature to do lots of research the first time I do something new, but if you're anything like me, once you've propagated a few plants it will all become second nature, far less worry and a lot more fun! Propagating my plants is now one of my favourite parts of the houseplant hobby.
Happy growing,
Anna :)
ABOUT THE AUTHOR: Anna is the owner of plant store Love That Leaf which specialises in products and advice for indoor plants. She is also the resident writer for NZ Gardener magazine on the topic of indoor plants. You'll see her houseplant care articles in magazines in-stores NZ-wide, and online on Stuff, The Post, NineHoney and more.